

- Actual rates as the new betaflight default
- Anti-aliasing of gyro data for 4k pid loops
- Antigravity improvements
- Betaflight f4 vs f3
- Bounceback
- Configurator improvements
- Credits:
- Crossfirev3 and ghost rc link improvements
- Dynamic gyro filter expo curve
- F4 v3 flight controller – купить недорого | aliexpress
- Failsafe
- Feedforward in level and horizon modes
- Feedforward smoothing settings for faster rx links
- Gyro sync and dma gyro data transfers
- Improved dynamic idle
- Linear and dynamic mixer options
- More accurate loop times
- New tuning sliders
- Osd fpv flight controller for airplane – купить недорого | aliexpress
- Other feedforward changes
- Pid-настройки
- Presets
- Pt3 based rc smoothing
- Random wobbles in hd footage
- Rpm crossfading
- Scheduler and task changes for more accurate timing
- The “d-first” tuning method
- Zero throttle instability
- Вкладка configuration
- Вкладка modes
- Вкладка motors
- Вкладка pid tuning
- Вкладка ports
- Вкладка receiver
- Вкладка blackbox
- Где купить полетный контроллер для квадрокоптера
- Зачем нужен f4?
- Как подключить akk f4 к квадрокоптеру
- Командная строка (cli)
- Конфигурация
- Моторы
- Настройка betaflight для первого полета
- Новый двойной bn-220 beitian bn220 gps глонасс и f4 v3 v3s plus контроллер полета для радиоуправляемых дронов fpv racing | игрушки и хобби | алиэкспресс
- Обзор полетного контроллера akk f4
- Питание и батарея
- Подключаем micro usb кабель
- Порты
- Прежде чем начать
- Различия
- Распаковка, технические характеристики
- Режимы
- Рекомендации: проверка безопасности
- Сходства
- Отзывы на akk f4
- Feedforward jitter reduction
Actual rates as the new betaflight default
Starting from 4.3, Actual Rates will be the new Betaflight default. See PR #10724 for graphs and more information.
Anti-aliasing of gyro data for 4k pid loops
When running a 4k PID loop, we strongly recommend keeping the gyro lowpass 2 filter active. If you want to drop to a single gyro lowpass filter, keep lowpass 2.
The reason is that lowpass 2 is a very effective anti-aliasing filter, when downsampling the gyro from 8k to 4k. If gyro lowpass 2 is disabled, and the board is running at 4k, a simple 2-point averaging filter will be enabled in its place. This is not as good an anti-aliasing filter as a PT1 filter at 1000hz, and nowhere near as good as 500hz.
For 2k PID loops, a 500hz PT1 lowpass 2 gyro filter is absolutely essential.
Most clean 4k quads will run great with gyro lowpass 1 turned off, and just a single gyro lowpass 2 filter at 500hz.
8k PID loops have no aliasing issues, so gyro lowpass 2 can be disabled without aliasing concerns, however the quad must be ‘clean’ to turn off all gyro filtering.
Antigravity improvements
Antigravity now increases P during hard throttle chops, since the abrupt change in pitch angle needs more than I term response to control it. Additionally, the timing of the I boost has been changed to better match the timing of the wobble.
The default is now only 3.5, reflecting the greater efficiency of the new code.
CAUTION: it is unwise to run very high AntiGravity values in 4.3, because you run the risk of significant P and I wobble during throttle chops.
Stick to values close to defaults.
If you do want to increase AntiGravity, test it methodically. High values, eg 5 or more, may not achieve much more than normal values; use the lowest value consistent with reasonable control.
See #10163 for more detail.
Betaflight f4 vs f3
Давайте сравним старую и новую платы, вот обзор ПК Betaflight F3.
Bounceback
Please refer to the 4.2 tuning guide. Most bounce-back is due to too much I on a low authority quad, and is usually best fixed by lowering the iterm_relax cutoff value, and increasing tracking and D values. Random wobbles at the end of some, but not all, flip or rolls, especially the faster ones towards the end of the flight, are usually caused by delayed motor start-up from excessively low idle, being over-propped, or weak ESC startup from low RPM (48kHz or dynamic ESC modes). These are best dealt with by enabling dynamic idle with a reasonably high minimum RPM value (eg 3500-4000 RPM).
Configurator improvements
Configurator has been overhauled with support for the new Sliders and the new Presets tab.
New motor mapping and motor rotation functions in the Motors tab make those frustrating tasks much easier.
Before flashing, we have a new “Auto-Detect” function that selects the correct firmware for your board, with the ability to re-check
The interface itself has been tidied up, and a bunch of bugs have been fixed.
Credits:
– Firmware PR management – Mikeller
**- Configurator and Blackbox – Haslinghuis, Limon, Asizon, ctzsnooze, McGiverGim, Mikeller, Blckmn **
– Presets – Limon, Mikeller, ctzsnooze
– Sliders – Haslinghuis, UAVTech/spatzengr, IllusionFPV, Asizon, ctzsnooze
– Looptime, scheduler, DMA, Gyro EXTI, improved logging and OSD efficiency – Steve C Evans, many massive PR’s 🙂
– Multi dynamic SDFT notch, filters – Karatebrot #10554
– RPM crossfading – Karatebrot #10757
– RC smoothing – ctzsnooze #10629, #10650
– Feedforward jitter reduction – ctzsnooze #10670
– Feedforward smoothing – ctzsnooze – #10164
– Antigravity – ctzsnooze #10163
– Expo on Gyro LPF – IllusionFPV #10239
– Linear and Dynamic mixer options – TylerCorleone, BorisB #10370
– Dynamic idle improvements – ctzsnooze #10294
**- ELRS over SPI – Phobos, Joe, Alessandro
– Configurator brilliance – Haslinghuis, McGiverGim, Limon, Asizon
– LUA Script – klutvott123, kristjanbjarni, codecae
– Feedforward in level and horizon – ctzsnooze #10778
– PT2 and PT3 lowpass filter options – ctzsnooze #10727
– RC Link improvements – TBS #10675, Stepan Dalecky #10801
– default to Actual rates – ctzsnooze #10724
– 4.3 Tuning Notes – ctzsnooze, editing by SupaflyFPV
– Bugfixes – lots of people!
– Keeping everyone and everything on track – blckmn, mikeller
- Encouragement and testing – Brian White, James, SugarK, Cory Ibanez, Tehllama42, SupaflyFPV, UAVTech, QuadMcFly, Limon, bizmar, and so many others : thank you!
Crossfirev3 and ghost rc link improvements
4.3 has a fully float based internal RC data path, resulting in no aliasing or loss of resolution regardless of RC packet contents. We also support Crossfire V3 and 11bit Ghost protocols.
We also better support very low frequency link rates – down to 16hz – by constraining the RC smoothing, and avoiding false packet timeout errors which would otherwise trash feedforward And we support up to 1000hz links by allowing deviations to 950ns without declaring an error.
Blackbox logs now show un-smoothed rcCommand, and the RC and feedforward debugs show un-smoothed Roll setpoint and other useful data for RC link quality and resolution checking.
Dynamic gyro filter expo curve
dyn_lpf_gyro_curve_expo allows the dynamic lowpass filter cutoff value to rise more quickly with throttle increases than it used to. It works much the same as the D lowpass expo.
This reduces delay at higher throttle positions. If you get significantly more high frequency noise at higher throttle, reduce the amount of expo, or reduce the upper value of the dynamic lowpass cutoff.
For graphs see PR9486.
F4 v3 flight controller – купить недорого | aliexpress
Failsafe
Режим сохранения, то есть, то, что будет делать квадрокоптер, если он потеряет связь с пультом управления.
Здесь есть 2 режима:
- Падение;
- Приземление;
- GPS спасение.
- Падение — если выбрать этот режим, то через секунду (настраивается в поле «Failsafe при низком значении газа, где стоит цифра 100) после потери сигнала, дрон отключит все двигатели и упадет.
- Приземление — при потере сигнала будет плавно приземляться, двигатели будут работать. Режим достаточно опасный, к тому же, нужно хорошо настроить обороты двигателей.
- GPS спасение — если вы установили на свой квадрокоптер GPS-модуль, то с его помощью можно настроить возврат квадрокоптера.
Если кратко, функция экстренная и созданная с целью вернуть управления квадрокоптером, а не его посадить, потому что нет дополнительных датчиков. Функция сработает, если вы улетите на расстояние не менее 50 метров (если не ошибаемся, то минимум можно установить 30 метров от точки взлета). Сажать дрон с помощью данного модуля не советуем, так как он ударит дрон о землю (нет других датчиков).
Вся задача модуля — в случае потери связи или, если вы засомневались в своих силах управления на дальнем расстоянии, активируете функцию GPS Rescue (либо она автоматически активируется), дрон поднимется на определенную высоту и полетит в ПРИМЕРНУЮ точку взлета. Главное, чтобы вы смогли перехватить управления на себя и не потерять/разбить дрон.
Обычно включают режим «Падение», так как с «Приземлением» непонятно где он будет приземляться с работающими винтами, а вдруг там будут люди?
Но если выбрали «Приземление», нужно настроить скорость вращения моторов, которые позволят плавно ему спускаться.
Блок «Failsafe переключатель» выполнит действие при активации тумблера, который присваивается функции на вкладке «Режимы». ПРи активации тумблера, выполнится сценарий Этапа 2.
Feedforward in level and horizon modes
In 4.3, feedforward now is available in Level, Level Race, and Horizon modes.
In Level Mode, this results in a more immediate response when moving the sticks to change the angle of the quad. The quad should more promptly assume your new intended angle.
In Horizon Mode, while flying aggressively, the behaviour is now nearly exactly the same as acro, with all the benefits that feedforward brings in terms of immediate stick response and reduced overshoot. It feels great!
If you’re a beginner and you find Level too twitchy, reduce the feedforward value in the PIDs.
For more detail see PR #10778
Feedforward smoothing settings for faster rx links
The old ff_smooth_factor code has been updated, and it is now named feedforward_smooth_factor. It provides second order step height smoothing for boost, as well as the usual first order smoothing to the simple derivative. This gives more effective smoothing of the boost signal with less delay to the simple derivative.
A suitable starting value of 25 is adequate for most builds.
For 250hz RC links, you should set feedforward_smooth_factor to 40-50, and feedforward_averaging to 2_point.
For 500hx RC links, you must set feedforward_smooth_factor to 65-70, and feedforward_averaging to 2_point.
Gyro sync and dma gyro data transfers
In 4.2 there were a number of issues in reading data from the gyro.
- The processor read data from the gyro in the gyro task using polled access, which means it had to wait for the read to complete, unable to do anything else.
- The MPU6000 gyro has irregular updates. Every 8th update takes not 125us, but 170us, followed by another of 80us. As a result the gyro task would occasionally read two samples, 125us apart, within the 170us interval and miss the update in the 80us cycle completely.
- Because the gyro update rate and the gyro loop were asynchronous, there was a random delay of up to 125us between the gyro data being updated (in the gyro) and the data being received and read/processed by the flight controller.
In 4.3, these issues are fixed, by:
- Transferring data using Direct Memory Access (DMA), where the processor initiates the transfer and can do other things while waiting for the data transfer to complete. This will reduce CPU load.
- Syncing the scheduler to gyro updates, using a hardware interrupt line from the gyro to the flight controller. This FC pin used is set by the
GYRO1_EXTIresource. When this sync is active, we reliably capture every single gyro update. - Reading data from the gyro immediately after being notified by EXTI that an update is available, and processing the data a consistent amount of time afterwards.
A hardware external interrupt line from gyro to FC is required to synchronise the gyro updates to the FC. Not all boards have this.
Not all boards can use DMA for gyro data requests.
Improved dynamic idle
The new dynamic idle code now uses a full PID controller, and is much simpler to configure. It improves desync resistance and low throttle authority.
Do not follow the old 4.2 instructions. You don’t need to measure RPM in the motors tab any more. All you have to do is:
- enable DShot Telemetry
- go to the PID tuning tab and set Dynamic Idle Min RPM to a value between 30 and 40 (ie, a minimum idle speed of 3000 to 4000 RPM).
NOTES:
- If DShot Telemetry is enabled, but it isn’t working properly, you won’t be able to arm.
- DShot Telemetry must be enabled for RPM filtering or Dynamic Idle to work.
- If DShot Telemetry is not enabled, Dynamic Idle will be disabled, and the ‘static’ DShot Idle percentage will be used.
- When Dynamic Idle is active, DShot Idle is rendered inactive, and is greyed out.
- There is no need to adjust DShot Idle to use Dynamic Idle. Leave it at whatever value you find works best.
- If the ESC supports DShot telemetry, you can now use Dynamic Idle even if you prefer not to use RPM filtering
The new code in 4.3 does not require any special adjustments to the DShot Idle percent value; just leave it at whatever value works best in the non-dynamic idle setting.
On arming, and until airmode is active, you will not get the full Dynamic Idle minimum RPM. Your motors won’t spin super fast on first arming, because there is a limit on the drive to the motors until Airmode activates. Dynamic Idle therefore acts as a kind of sophisticated ‘idle up’ function that provides all the benefits of the old manual in-flight idle-up switches, but without the drawbacks.
With high minimum RPM, the motors retain RPM at all times, leading to more responsiveness at zero throttle, cleaner flips and rolls, and neater turns. At high values, the slowest motors will provide thrust during flips, rather than almost stalling, and the quad will tend to perform a kind of circle in the sky. The same happens on 180 degree turns, which become little arcs.
Also, with high minimum RPM high, the quad will be slower to lose altitude in ‘right-side-up’ flat throttle chops, because the motors will generate some upwards thrust all the time. This isn’t all that bad, and will also enhance stability and authority in these moves, which can otherwise suffer badly from propwash.
Linear and dynamic mixer options
When airmode is active, the default betaflight mixer prioritises PID authority over throttle. Anytime a motor might need to be driven ‘below zero’ in order to maintain authority, throttle is increased by airmode so that the requested motor differential can be achieved.
This airmode-driven throttle increase is the only reason why we can flip and roll ‘normally’ at zero throttle.
However, there are downsides. Airmode leads to strong reactions on impacts; the quad will get more throttle and climb. There is a fairly abrupt change in authority once the limits that Airmode can provide are reached.
These alternate mixer models change the relative emphasis between throttle authority and PID control.
They may have some use in smooth cinematic flying styles, providing a kind of partial airmode effect with less bounce on landing at the expense of limited low throttle PID performance in quicker moves. If interested, just fly and see if you like them or not.
For more detail see PR #10370
More accurate loop times
Steve C Evans has made massive changes that almost completely eliminate PID loop jitter and improve the overall efficiency of the scheduler. No special configuration is required in most cases; it just works. You’ll get better filter accuracy, cooler motors and longer flights.
New tuning sliders
We’ve completely overhauled the PID tuning sliders! They provide a very quick and simple way to tune the quad, whether at the field or at your computer.
Osd fpv flight controller for airplane – купить недорого | aliexpress
Ищете osd fpv контролер полетов для самолета по приятной цене? osd fpv контролер полетов для самолета как раз есть на AliExpress! А ещё множество проверенных брендов и суперскидки на osd fpv контролер полетов для самолета во время распродаж. Не забудьте отфильтровать товары по таким критериям, как бесплатная доставка и бесплатный возврат, чтобы ваш онлайн-шопинг был максимально удобным.
Other feedforward changes
A number of small, but significant, feedforward changes result in a smoother signal with less delay.
All parameters in the CLI that relate to feedforward now start with feedforward, not ff_. Go get feed to list them all.
feedforward_averaging is now set to ‘off’ by default, since most builds won’t require it. It should be set to 3_POINT to provide three point moving averaging for old Crossfire 150 links. All 500hz RC links and nearly all 250hz RC links benefit from 2_POINT feedforward averaging, but the new jitter reduction code means that most links running below 250hz (FrSky, Crossfire, etc) do not require any feedforward averaging.
feedforward_max_rate_limit replaces ff_max_rate_limit and is the value that pulls back on feedforward as the sticks approach their maximum rate, minimising overshoot when hitting max stick position. A bug that limited its usefulness has been fixed. The default value of 90 works best for most quads. Under-powered quads may need 100.
Duplicate packet interpolation has been improved. Since duplicates occur frequently at slow stick movement speeds, we now use the jitter reduction value to attenuate the interpolation process, so that we interpolate very little when the sticks are moving very slowly.
These changes give us a much smoother but super responsive feedforward system.
Pid-настройки
Сложный раздел, в котором настройки производят далеко не все пилоты, за исключением очень увлеченных и профессионалов.
Углубляться в этой статье нет смысла, так как у нас есть несколько отдельных статей по этому разделу:
Presets
The new Preset tab is probably the most useful improvement to Configurator in a long time.
Betaflight’s defaults originally were made to suit 5″ freestyle machines for fun flying in the park. These days there are huge performance differences between 5″ race, freestyle and cinematic builds, and even greater differences between whoops, twigs, heavy camera builds, 7-10″ and X-class builds. They all have very different performance envelopes.
The 4.3 Configurator release (10.8) now provides a Preset system, make it easy to find one or more sets of CLI commands that make it easy to find a tune that suits your quad, your flying ‘style’, your Radio or VTx setup, and so on. Once you’ve applied those Presets, hit Save and go fly!
Presets often include ‘options’, and can be used to reset parts of the machine to defaults. Read the instructions carefully before applying.
The Preset page also provides an easy way to backup and restore your configuration.
WARNING: Always backup your quad’s default configuration BEFORE changing anything, and again before ‘saving’ a Preset! Once you’ve saved a Preset, the changes are permanent. There is no ‘easy way’ to reverse saved changes! Feel free to check out as many different Presets as you like, but once you save one, there is not going back if you failed to backup the previous configuration!
Presets are ‘approved’ after evaluation via the GitHub ‘pull request’ method, and are not included in Configurator unless we are confident that they are ‘good enough’.
To add a new Preset to Betaflight, open a pull request.
External Preset repositories are supported, but are not checked or validated by Betaflight.
Comments or feedback on any given preset should be provided via the originating pull request. A link button is provided in the Preset manager.
Pt3 based rc smoothing
The RC smoothing system has been simplified and improved. Cinematic or HD pilots can now get amazingly smooth results that were impossible before.
The old linear interpolation method has been removed because the PT3 filter-based method works better (no overshooting, lower latency, better tunability).
We very strongly recommend keeping rc smoothing ‘on’ at all times – ie with set rc_smoothing = ON. If you turn it off, your motors will get very notchy drive signals, run hotter and noisier, and lower link speeds will shake the quad at link frequency.
The auto smoothing algorithm hasn’t changed, It detects your RC link speed on arming, sets the RC smoothing cutoffs automatically, and changes their values if the link speed changes in-flight (though it takes a while to do so).
The default auto smoothing value is now 30, which gives a reasonably well-smoothed setpoint line and very little delay when compared to the un-smoothed signal.
For HD freestyle, an auto value of 60 will provide greater smoothness and not a whole lot of extra delay.
For cinematic video, where absolute smoothness is needed, auto values around 90-120 will give that silky effortless smoothness you are after, at the cost of obvious stick delay. In association with jitter reduction and feedforward smoothing, most cinematic footage will be incredibly smooth.
The auto smoothing function adjusts the filters to give the least delay for the given link speed. At higher link speeds, the smoothing filters run faster, and give quicker stick responses.
For cinematic flying with a fast radio link, and for crossfire in a non-locked mode, it may be best to manually over-ride the auto smoothing, to get a consistent amount of smoothness throughout the flight, and across builds with different radio links.
The same applies to non-locked crossfire, which can swap between 50Hz and 150Hz, randomly. Here a value of 20-30hz will give reasonably consistent stick feel and reasonable smoothness even in 50hz mode:
We generally don’t advise going below 30 for auto smoothness, though at high link speeds, eg 250 or 500hz, a value of 20 may be good for racing, by keeping delay to the absolute minimum. There will be some transfer of the RC link frequencies into your motors, but not much. If you can hear a difference, or your motors run warmer, go back to 30.
In most cases, stick with the default auto smoothing, and once you’ve decided on your radio link speed, or after changing radios, adjust the auto smoothing value to get the result your after.
RC smoothing value for throttle is independently adjustable, automatically or manually. Its best left at 30, unless you are a high link speed racer and want to try 20. To avoid throttle jumps on a cinematic build, go higher, but be wary of throttle lag when you need to pull up from a dive 🙂
RC smoothing is now applied equally to setpoint and feedforward in Auto mode. The log header will show the actual frequencies being used with your link. In the CLI you can manually configure the amount of smoothing on feedforward relative to setpoint.
Testing to date has not shown this option to be clearly useful, in any practical sense, and likely it will be removed down the track. It makes more sense to control stepping in feedforward by using feedforward smoothing (feedforward_smooth_factor);
For more detail see PR #10650
Random wobbles in hd footage
This is typically an issue for cinematic HD applications. There is low level, random instability of the horizon when flying straight forward. Usually the frame is too soft or flexy, or it is being shaken by slightly out of balance props or worn bearings. The following suggestions may help minimise this problem:
- get a really rigid frame, check bearings and shaft play, balance the props, don’t let anything wobble around
- tune for the highest possible D that the setup will tolerate, and avoid setting P too high
- get the Derivative value close to P, or up to 20% above P. You may need more D filtering than usual – check the motor temperatures and listen for idle grinding or other signs of D resonance.
- set TPA to start just below the cruising throttle value, so you don’t have too much D at higher throttle values.
- once you have D as high as you can get it, experiment with more vs less P. Too much P will cause wobbling and audible fluttering in fast turns, and may make the random wobble issue worse. If you never turn fast, you may be able to get higher P than otherwise.
- if the quad lacks authority, attenuate I using the expert mode I adjustment slider
- make sure the ADC is not ticked in the hardware settings of OpenTx!!
- make sure the frame is super stiff and nothing is able to wobble or flap around
- be sure your capacitor is big
- sometimes the gyro chip isn’t working properly, and some ESCs just don’t play nice, if all else fails, try changing these parts from a quad that does fly perfectly.
- use a jitter reduction factor of 10-12. To test if feed-forward is making it worse, do a test flight with feedforward at zero. If there is no change, feed-forward isn’t the problem, and can be used at normal settings.
- high level RC smoothing (auto smoothing of 90 or higher) will attenuate the erratic behaviour of old gimbals or ‘thumb shake’. To test whether your RC link is the problem, temporarily set a wide deadband. We don’t recommend deadband much, but a high deadband test will eliminate all random noise on the RC link, when sticks are centred. If that makes no difference, your RC link isn’t the cause of the problem.
- use very soft mounting for the camera.
Rpm crossfading
This is a brilliant improvement over normal RPM filtering, which gives much cleaner motor signals at low to mid-throttle, and improves propwash considerably. Basically we now can have the RPM filtering benefits when we need them, with none of the drawbacks when they are not needed.
We discovered that notch filters operate by generating an ‘anti-noise’ signal at their specified cutoff frequency. They don’t generate ‘delay’ in the conventional sense. Not in the same way that a lowpass filter does. They make a signal which, when mixed with the original, ‘cancels out’ the noise in the original signal.
This means that we can attenuate a notch filter in a linear fashion, by ‘cross-fading’, or ‘mixing’, it’s ‘anti-noise’ signal in, or out, like an audio mixer.
This is extremely useful for RPM filtering. Previously, when any motor went below the minimum RPM frequency, its three RPM notches would all remain active, but be held at their minimum frequency. While there was no noise to remove, they generated ‘delay’ and reacted to nearby frequencies, and causing a form of intermodulation distortion, and worsening propwash.
Now, we can essentially ‘turn the RPM filters off’ when they aren’t needed, and bring them back on smoothly over a ‘cross-fade’ range above the minimum rpm value.
Once the rpm filters are completely ‘off’, they cause no delay or interference of any kind, resulting in cleaner and better gyro traces than before.
In most builds, significant RPM related noise doesn’t start to happen until about 100hz (6000 rpm). So we can start the RPM filtering at say 80hz and cross-fade it over 50hz, so that by 130hz, or 10,000 rpm, you have full RPM filtering active again. eg:
We have found a cross-fade range of 50hz to be optimal in most cases.
The default minimum RPM value, where RPM first starts to ‘switch on’, at 80hz, also works well for most quads. Machines with very clean props and very little intrinsic RPM noise can have this value shifted higher, eg
Very large quads with low RPM we would choose proportionally lower values since they operate at low RPM.
Tuning for Crossfade requires enabling the dshot_telemetry debug, doing some smooth steady throttle-ups, from zero to 50%, with no other stick inputs, and then add throttle cuts. It’s best to set PIDs low with heavy filtering on D to take out D noise.
Using the debug traces, look at the point where the motor RPM falls into the cross-fade region, and see if motor RPM related noise is getting into the gyro trace. If the minimum rpm is set too high, you’ll get significant motor noise leaking through the crossfade region.
If you’re not sure what you’re seeing, set the cross-fade minimum very high. This will effectively disable RPM filtering at lower RPM and let the noise through. If you set the minimum with a very low crossfade value, eg 10; there will be a sudden change when the rpm filtering kicks in.
The minimum should be set to a point below where rpm noise becomes an issue, and the crossfade range can be extended upwards until it too allows some, but not too much bleed-through, in the upper cross-over region. The goal is the highest values consistent with reasonable attenuation of the motor noise.
For more detail see PR #10757
Scheduler and task changes for more accurate timing
Betaflight uses a cooperative multi-tasking scheme, which means that the scheduler needs to know how long a task will take to run, so it will call it only when there is time before a vital operation such as running the gyro/filter/pid tasks. If a task takes longer to execute than predicted, then other vital tasks will be late.
In 4.3 it’s best to run F405 and F411 boards at 4k, not 8k, if RPM filtering is enabled. For F411 processors this is enforced.
F411’s may be overclocked to 120Mhz.. They don’t run hot like F405’s, most run perfectly well at 120Mhz. Some may be erratic at 120Mhz, but OK at 108Mhz, perhaps depending on the grade of the chip used on the board or other board related factors; if they are more stable at 108Mhz, use that. Let us know via GitHub and we may be able to update the Target info for the board.
DShot300 should be always used at 4K. While there may be no errors reported, using DShot600 can cause loop instability at 4k.
The “d-first” tuning method
The ‘D first’ tuning method involves stepwise increases in D until something bad happens, then easing back a click or two, and not going higher. After that, the process is repeated for P, then you’re done.
This is based on two fundamental concepts:
- the more D you can apply, the more P you can use;
- generally, a quad will track best with the highest P and D it can tolerate.
The following are common indications, while increasing D, that it’s time to drop back a bit:
- motors getting hot,
- we hear grinding or humming sounds on arming
- the quad noisily ‘flies to the moon’ on arming
- bent props make the motors really hot really quickly
We know that the primary limit on how much D you can run is how clean the build is. Builds with good bearings, well balanced and well centred motors, stiff frames, stiff props, etc, will accept more D. Different props or ESC settings can have an influence.
Once you’ve set D as high as it can reasonably go, bring P up until something bad happens, e.g.:
- a fluttering sound from P oscillation in hard mid to high throttle turns, or
- under-damped short duration overshoots or resonances in step responses, or
- straight out P oscillation.
Usually most quads end up with P around the D value, or a bit higher.
Zero throttle instability
- go back to 24kHZ PWM if you’ve set the ESC to 48kHz
- enable dynamic idle at 3500- 4000 RPM
- try thrust linear at 25
- try slightly higher overall PIDs
Вкладка configuration
- Раздел ESC/Motor Features
Протокол регуляторов скорости (регуляторов оборотов) — посмотрите на характеристики вашего оборудования, какие протоколы оно поддерживает. Рекомендуется использовать DShot. Обычно регуляторы с прошивкой BLHeli_S поддерживают DShot300 или DShot600, а с прошивкой BLHeli_32 — даже DShot1200.
Дополнительная информация: протоколы и прошивки для регуляторов скорости.
Рекомендую отключить параметр «MOTOR_STOP«, иначе вы не сможете определить армлен коптер или нет.
Остальные параметры можно не трогать и оставить значения по умолчанию.
2. Раздел System Configuration
Looptime — время цикла, с этой частотой полетный контроллер рассчитывает полетные параметры, значение зависит от возможностей процессора, на шумных коптерах я предпочитаю использовать довольно низкую частоту 2 кГц, а на качественных коптерах — частоту повыше — 8 кГц. В любом случае, для начала подойдет и 2 кГц.
Gyro Sampling Rate — частота опроса гироскопов, обычно совпадает с looptime, хотя некоторые предпочитают поставить удвоенную частоту looptime. Можете поставить 4 кГц и looptime 2 кГц.
Потом поэкспериментируете и выберете наиболее подходящие значения, жестких правил по их выбору нет.
При смене значений этих параметров обратите внимание на CPU load (загрузка процессора) внизу экрана, старайтесь держать это значение меньше 30%. Если значение будет выше, то полетный контроллер может работать нестабильно.
Accelerometer — можно отключить, это высвободит немного процессорных ресурсов, но тогда вы не сможете использовать режимы Angle и Horizon, а 3Д модель на вкладке Setup перестанет двигаться. Еще одна причина по которой отключают эту функцию — чтобы избежать проблем при арминге коптера, если он сильно наклонен.
Отключите Barometer и Magnetometer, они нам не нужны, т.к. мы летаем на миникоптере.
3. Раздел Personalization
Craft name — название коптера, это значение будет отображаться на экране при помощи Betaflight OSD.
4. Раздел Receiver
Если у вас приемник SBUS, IBUS или Spektrum Satellite, тогда выбирайте «Serial-based receiver» в выпадающем списке «Receiver Mode». В параметре Serial Receiver Provider нужно выбрать SBUS, т.к. у нас приемник FrSky.
Если приемник использует PPM, тогда выберите PPM RX Input в списке Receiver Mode.
5. Раздел Other Features
Обычно я включаю нижеуказанные функции Betaflight. Если вы не уверены в том, нужны ли они, просто оставьте значения по умолчанию, они не помешают первому полету.
- Anti-Gravity
- Dynamic Filter
- Telemetry (чтобы работала SmartPort телеметрия)
- OSD (если ваш ПК поддерживает Betaflight OSD)
Нажмите Save & Reboot.
Вкладка modes
Тут мы настраиваем полетные режимы и их активацию при помощи дополнительных (AUX) каналов управления (тумблеры на аппаратуре управления):
- Arming (арминг, включение коптера/моторов)
- Airmode (управляемость коптера при 0 значении газа)
- Angle mode (режим полета без автовыравнивания)
- Beeper (пищалка)
Я предпочитаю активировать Airmode тем же тумблером что и арминг коптера, а не отдельным, но это дело вкуса.
Вкладка motors
Проверим порядок моторов:
- мотор 1 — сзади справа
- мотор 2 — спереди справа
- мотор 3 — сзади слева
- мотор 4 — спереди слева
Если у вас другой порядок моторов, тогда его нужно поменять при помощи переназначения ресурсов (Resource Remapping).
Подробная инструкция по переназначению ресурсов
Теперь проверьте направление вращения моторов, его можно поменять в BLHeliSuite.
Инструкция: подключаем BLHeliSuite (конфигуратор для регуляторов скорости) через полетный контроллер
Вкладка pid tuning
Для первого полета здесь ничего менять не нужно. Но настройка ПИД коэффициентов и рейтов может помочь летать лучше.
ПИД — это по сути 3 коэффициента для каждой оси: крен (roll), тангаж (pitch) и рысканье (yaw). Настройка этих коэффициентов подразумевает, что вы понимаете, как они влияют на летные характеристики.
Вот моё руководство по настройке ПИД (англ).
Rate, Super Rate и Expo — определяют то, как резко коптер будет реагировать на движение стиков.
Руководство по настройке Rate, Super Rate и Expo
Вкладка ports
- Если у вас приемник SBUS или IBUS, тогда включите «Serial RX» на том порту, к которому приемник подключен.
- Если вы используете SmartPort телеметрию, тогда в столбце Telemetry Output выберите «SmartPort«; если не используете, тогда ничего не меняйте.
Вкладка receiver
Тут мы проверяем, что приемник работает правильно.
Включаем аппаратуру управления и приемник, двигаем стики по одному и наблюдаем как меняются значения в соответствующих каналах. Если меняются не те каналы, тогда нужно поменять их порядок в параметре «Channel Map«.
Если ни один из каналов не работает, тогда начинаем искать проблему:
- приемник привязан к передатчику (забинден)? На приемнике должен гореть зеленый светодиод
- приемник правильно подключен/припаян к полетному контроллеру?
- уверены, что Serial RX включили на нужном порту?
- уверены, что правильно выбрали протокол?
После того как убедитесь, что все каналы работают правильно, проверьте значения в средних и крайних точках в первых четырех каналах (Pitch, Roll, Yaw, Throttle, т.е. тангаж, крен, рысканье и газ). В центральном положении эти каналы должны иметь значение 1500, а крайние значения 1000 и 2000.
Если у вас другие значения, тогда читайте вот это руководство по настройке центральных и конечных точек.
Вкладка blackbox
Черный ящик нужно для того, чтобы записывать все данные полета — телеметрию. По мере того, как вы будете набираться опыта, журнал черного ящика будет вашим лучшим другом по настройке своего дрона. Blackbox по умолчанию включен. Данные будут писаться либо во встроенную флеш-память, либо на внешнюю SD-карту.
У всех современных полетных контроллеров есть своя память и это как минимум 16 мегабайт. Этого вполне хватит, чтобы записывать логи полета.
Где купить полетный контроллер для квадрокоптера
Обзор квадрокоптеров
Зачем нужен f4?
F4 — более мощный процессор, чем F3 (разница между сериями STM32).
Стоит ли обновлять имеющийся Betaflight F3? Думаю, это зависит от того, на сколько вам нужен более быстрый луптайм и новый функционал Betaflight.
С момента выхода Betaflight 3.2 мы заметили, что многие пользователи стали жаловаться на высокую загрузку процессора. В основном это связано с новой функцией «Dynamic Filter», которая слишком трудоемка для F3. Поэтому пользователям F3 при использовании Dynamic Filter пришлось менять луптайм с 8k на 4k.
Следовательно, если вы хотите получить самый быстрый луптайм (8k/8k) со включенным Dynamic Filter, тогда придется использовать более мощный процессор F4.
Как подключить akk f4 к квадрокоптеру
На картинке выше вы можете увидеть стандартный метод подключения полетного контроллера от фирмы AKK к периферии квадрокоптера.
Командная строка (cli)
Через командную строку можно влиять на какую-либо информацию в прошивке, вносить изменения, а также выводить информацию о каком-либо параметре или компоненте. Список команд большой и выводится по команде «help». Все рассказывать здесь не будем, так как у нас опять есть отдельная статья по командной строке, если вам интересно, то ссылка ниже.
Конфигурация
На этой вкладке выполняются базовые настройки, такие как протокол связи полетного протокола с регуляторами оборотов, протокол связи приемника с полетным протоколом, расположение платы и многое другое.
Моторы
На этой вкладке проверяется работоспособность двигателей:
Перед любыми действиями, обязательно снимайте пропеллеры с двигателей!
Перед тем, как покрутить двигатели ползунками, переключите флажок «я понимаю всю опасность», чтобы активировать функционал. Теперь можете подвигать ползунки, моторы начнут крутиться: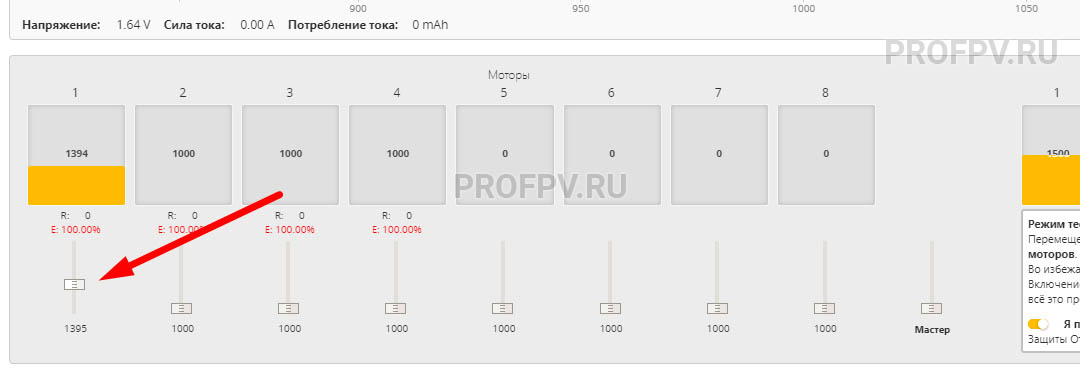 Чуть выше располагается график гироскопа, а также информация о том, сколько потребляют двигатели тока, а также силу и напряжение. Все это служит для проверки и настройки двигателей.
Настройка betaflight для первого полета
Тут мы пройдемся по основным параметрам Betaflight, необходимым для первого полета.
Важно! Снимите все пропы с коптера прежде чем начинать настройку!
Новый двойной bn-220 beitian bn220 gps глонасс и f4 v3 v3s plus контроллер полета для радиоуправляемых дронов fpv racing | игрушки и хобби | алиэкспресс
GPS, ГЛОНАСС, BDS, GALILEO, SBAS, QZSS.
По умолчанию GPS, ГЛОНАСС, SBAS, QZSS.
Обзор полетного контроллера akk f4
Полетный контролер AKK F4 это разработка фирмы AKK Technology. Этот полетный контроллер разработан на базе процессора STM32F405RGT6, вы можете использовать его с прошивками BetaFlight и iNav.
Давайте посмотрим, что же из себя представляют эти “мозги для квадрокоптера”.
Приходит AKK F4 в антистатическом пакете, сама печатная плата контроллера представляет из себя квадрат со стороной 36 мм. По ее углам расположены омедненные крепежные отверстия, центры которых удалены друг от друга на 30,5 мм. Весит контроллер всего 5,6 грамм.
На верхней стороне печатной платы AKK F4 установлены: микроконтроллер STM32F405, датчик движения MPU6000, выполняющий функцию гироскопа и акселерометра, гальванометр, кнопка аварийной перезагрузки и пара разъемов внешних портов (micro USB, DSM2).
На нижней стороне находятся OSD процессор AT7456E, преобразователь напряжения (BEC) и разъем PWM. По краям платы размещены монтажные отверстия, через которые можно подключить зуммер, ESC, OSD видео, внешние светодиоды и прочие периферийные элементы. Состав более дорогих комплектаций расширен за счет установки слота для карт памяти MicroSD и замены части монтажных отверстий дополнительными разъемами.
Схема расстановки элементов и назначение разъемов взята с офицального сайта производителя полетного контроллера AKK F4.
Питание и батарея
В этом разделе настраивается датчик тока, а также параметры аккумулятора. Все это нужно для того, чтобы квадрокоптер по OSD передавал актуальные и правильные данные об аккумуляторе, напряжении и токе во время полета.
У нас есть отдельная статья по этому блоку, рекомендуем к прочтению: Как откалибровать датчик тока и датчик напряжения в Betaflight
Подключаем micro usb кабель
Подключенный MicroUSB кабель питает полетный контроллер.
В конфигураторе должен появиться новый COM порт, выберите его и нажмите «Connect«. В моем примере порт COM11, у вас скорее всего будет другой номер. При подключении разных ПК, номер порта тоже будет разным.
Порты
На этой вкладке находятся настройки для UART-портов, то есть, для последовательных портов, которые используются для обмена данными с различными компонентами, такими как приемник, видеопередатчик, GPS-модуль и так далее. USB VCP всегда включен, это тот порт, в который вы вставляете провод, microUSB.
В этом разделе обязательно нужно включить порт, который используется для обмена информацией с приемником. У различных полетных контроллеров он может быть разным, у нас Mamba F405 и у него порт для приемника — UART1. Поэтому включен ползунок на Serial Rx. Вам нужно посмотреть документацию к своему полетному контролеру, чтобы точно знать, какой порт включать для приемника.
Прежде чем начать
Чтобы сделать это руководство наиболее простым, я подразумеваю, что у вас есть вот это железо:
Различия
Самое значительное отличие — используемый микроконтроллер (процессор). BEC рассчитан на меньший ток, но, говорят, зато более надежный. Имеется контакт для телеметрии BLHeli32 (RX1 между выходом на мотор и землей). И еще они убрали слот для MicroSD флешки и заменили его на чип памяти.
Однако, как и у многих других ПК на F4 имеется проблема с инвертированием сигнала SmartPort телеметрии. Это небольшая проблема, более того, у нового приемника R-XSR даже имеется специальная контактная площадка.
Вот табличка для сравнения изменений:
| Betaflight F4 | Betaflight F3 | |
| Процессор | STM32 F405 | STM32 F303 |
| IMU (Gyro) | MPU6000 | MPU6000 |
| BEC | [email protected] | 5V@2A |
| Телеметрия регуляторов скорости | Да | Нет |
| Память для Blackbox | Флэшпамять | Micro SD |
| Цена | $45 | $43 |
Распаковка, технические характеристики
ПК Betaflight F4 поставляется в пластиковой коробочке, внутри только плата и сервокабель длиной 10 см. Было бы неплохо увидеть еще конденсатор с низким ESR или антивибрационные бобышки.
- F4, MPU6000
- Встроенная PDB
- Betaflight OSD
- Датчик тока (до 145A)
- Флэшпамять для Blackbox
- 5V / 1.5A BEC
Режимы
Этот раздел сделан для настройки разных тумблеров и крутилок на пульте управления.
Мы будем настраивать 2 стика:
- Арминг — поставнока и снятие с охраны квадрокоптера;
- Включение режима стабилизации и АКРО режим (ручной режим управления).
Чтобы назначить тумблеру действие, делаем следующее:
- Наводим мышь на ARM и жмем «Добавить диапазон»;
- Выбираем канал AUX1, например, либо можете оставить «АВТО» и щелкнуть любым удобным тумблером, автоматически будет выбран канал, который привязан к этому тумблеру (каждому тумблеру в пульте нужно привязать свой канал, как это делать, смотрите в видео (на английском, но все понятно):
После того, как выбрали AUX, пощелкайте тумблером. На ваши действия, по полоске будет «бегать» желтая точка, она соответствует положению тумблера. Если переместить желтые полоски на область , где будет находиться желтая точка, то квадрокоптер начнет реагировать на это положением, в нашем случае это арминг или снятие с охраны. - Нажмите «Сохранить».
Теперь, когда вы переведете этот тумблер, моторы дрона начнут вращаться с маленькой скоростью, дрон будет снят с охраны. Это называется «Заармить».
Так как на странице Конфигурация был включен ползунок на AIRMODE, квадрокоптер сейчас находится в ручном режиме без стабилизации, то есть, в режиме АКРО.
Режим ANGLE это режим стабилизации. Его назначаем на другой тумблер. Обычно эти 2 режима назначают на один тумблер у которого 3 позиции, то есть, на вторую позицию настраивают ARM и АКРО, а на 3 позицию ANGLE режим, чтобы они не накладывались друг на друга и в случае чего, вы просто переведете в верхнее положение тумблер, чтобы включилась стабилизация.
Рекомендации: проверка безопасности
Перед установкой пропеллеров, рекомендую выполнить ряд проверок, чтобы избежать проблем перед полетом.
Проверить направление двигателей
Перейдите во вкладку «Моторы» и включите режим тестирования по кнопке «Я понимаю всю опасность»:
Теперь запустите моторы (надеюсь вы сняли пропеллеры?) и проверьте, в правильную ли сторону крутятся двигатели в соответствии с этой схемой:
Проверить загрузку процессора
Пока квадрокоптер подключен к Betaflight, посмотрите на нижний сайд-бар:
Если загрузка будет 95% и выше, то у вас будут проблемы во время полета, так как процессор перегружен и не будет успевать вовремя обрабатывать данные. Чтобы решить эту проблему, отключите некоторые функции или отключите разгон, если у вас контроллер F4. Но на современных полетных контроллерах такая проблема — большая редкость.
Проверить гироскоп
Перейдите во вкладку Система и и проверьте настройки гироскопа:
Возьмите квадрокоптер в руки и наклоняйте его во все стороны, ваши действия точь-в-точь должна повторять 3D модель на экране. Стрелка указывает на нос дрона. Если это не так, вернитесь в начало статьи, «Конфигурация», блок 2.Кроме этого, после настроек и тем более прошивки, нужно калибровать акселерометр.
Сделайте бекап настроек
Сходства
Расположение элементов на плате и их размеры практически идентичны: контакты для подключения моторов, последовательные порты, вход/выход видео и т.д.
Отзывы на akk f4
Полетный контроллер AKK F4 в продаже достаточно давно, так что информации о нем достаточно много. Что радует – практически нет негативных отзывов.
Полетный контроллер имеет Blackbox («черный ящик»), вы можете включить запись всех датчиков и действий ПК,в базовой версии доступно 16 Mbyte для записи логов. Так же можно купить AKK F4 с предустановленным слотом для карты памяти MicroSD, тогда запись логов будет ограниченна только емкостью карты памяти.
AKK F4 обеспечивает все базовые функции, присущие современным контроллерам полета. Наличие нескольких последовательных портов (UART) делает устройство более гибким и удобным в применении. Хорошим удобством для пользователей является кнопка перезагрузки (Boot), теперь не требуется отключать питание для того, что бы перезагрузить полетный контроллер.
Feedforward jitter reduction
This is a really exciting change that gives real smoothness when you want it, while giving as much feedforward ‘snap’ as you could want with quick stick inputs. Perfect for smooth fast racing and for ‘flick’ freestyle inputs.
It completely removes the need to use the old Dterm/feedforward ‘transition’ function, which provided feedforward attenuation only when sticks are centred. This provides similar attenuation at any position while the sticks are still, or moving slowly.
Feedforward, especially with boost, is known as the ‘stick responsiveness’ parameter, and for good reason. It provides a strong and immediate reaction to stick inputs. A good amount of feedforward (say 120-130) will make the quad super responsive, without adding overshoot. It gives those ‘snap’ freestyle inputs extra zing, and gives race pilots near-zero setpoint-to-gyro lag.
However, it accentuates even the tiniest of RC inputs, and can make for twitchy flight and jerkiness in HD video. It doesn’t matter if those RC twitches come from nervousness, slightly sticky or noisy gimbals, RC link connection problems, they all get exaggerated by feedforward… Until now.
The ‘old’ way to handle these ‘jitters’ was to use feedforward transition, which linearly attenuated feedforward down to zero when your sticks were close to the center position. This solved the problem of ‘too much feedforward’ at centre stick position – but nowhere else.
Transition has a number of limitations. It only works when the sticks are centred; if you are in a smooth turn, with sticks off-centre, but still, you want smooth flight also. However transition is much less effective in this setting. Also, when moving the sticks across the centre, in a smooth move, transition will cut the feedforward out abruptly at centre, causing a wobble, worst with narrow transition ranges.
Jitter reduction attenuates feedforward strongly when the sticks are moving slowly, regardless of their absolute position.
Think of it as a kind of ‘dynamic transition’ function.
